Great! Welcome to a wonderful hobby.
The purpose of this post is to outline how to get started and stay safe while doing so. I have a tendency to ramble, so I’ve included a concise “quickstart” guide. I’ve written this under the assumption that the reader is a beginner and does not have the space/time/money to set up their own blacksmithing shop. For that reason, I’ve excluded much information on equipment and materials, assuming these will be available from a teacher. I’ve also covered basically nothing about the actual process of blacksmithing. This will come from in-person mentorship and the John Switzer / Black Bear Forge link below contains many excellent instructional videos about how to actually make things.
I know this is a lot of text, and I hate that I have to even say this, but none of this was generated by an LLM. I wrote it in the hopes that it would be useful. Sorry that the images on ths page will probably load slowly. This website is hosted on my home PC for my own networking practice, and is therefore worse than a “real” website.
Quicker-start
Find an ABANA affiliate, go make friends, and learn something. Use common sense and attentiveness to prevent 95% of injuries and read the “Health and Safety” section titles below to prevent the other 5%.
Quickstart
-
Don’t get overwhelmed. There is a lot of information on this page, but you don’t need to memorize all of it.
My reason for writing so much is that if you want detail on certain topics, then it’s available to you. I started blacksmithing when I was 12 years old, and much of that was relatively unsupervised. If a rather stupid 12 year old can fumble his way through learning about blacksmithing, I bet you can too!
-
Read the Health & Safety section. Okay, that’s a lot of info. PLEASE at least read the subsection titles.
-
Find a blacksmith near you. Go to the ABANA affiliates directory and find a group you can drive to ("+" and “-” to zoom in/out on the map if scrolling does not work). This might mean driving an hour or two, which is a pain and will limit how often you can practice the hobby, but that’s a price we have to pay before establishing ourselves.
There are also probably blacksmiths in your area not on the ABANA list who offer classes. Search online for “Blacksmithing class in [your city]”. E.g., here’s a blacksmith in Trenton, NJ. Classes like these are more expensive and you’ll have less freedom in what you make, but you might consider it worth the money just to get your feet wet. Try the hobby, see if you like it, and consider whether you want a more permanent setup.
A personal class will cost $50-$100 and membership in ABANA groups can range from $5-$50. Joining an ABANA group is your best option for regular blacksmithing as a beginner without equipment.
-
Get some PPE. If you are working with an established smith, they will probably let you use their basic tools (hammers, tongs, anvil, forge, chisels, punches, etc.). If they don’t, they’re an ass and you should find someone else to work with. The basic equipment does not easily wear down, so it costs practically nothing for a smith to share these. However, personal protective equipment tends to wear down over time, so you should supply it yourself rather than consuming theirs. Remember to be courteous - a snack or a drink goes a long way in showing your appreciation.
You will need gloves, eye protection, and hearing protection. Many smiths do not wear gloves (discussed in more detail below), but I think this is a bad idea. Fewer, but still many, smiths skip the eye and ear protection as well. This is a bad idea.
- Gloves: Do not spend $30 on a pair of gloves. You’re going to end up putting holes in them and replacing them before you know it. I’ve tried a wide variety of gloves, and simple split-leather gloves are my go-to. You can find these for $5-$10 and they offer good protection and durability. Do not waste your money on tacticool gloves marketed toward people who want to look and feel like a badass.
- Eye protection: Any simple safety glasses will be fine.
- Hearing protection: Anything will do. You can keep it as simple as using foam earplugs, or as fancy as over-the-ear construction jobsite hearing protectors with bluetooth.
-
Don’t go buy a bunch of tools yet. This is something to worry about once you have a permanent set-up.
If you really want to buy something, get a hammer. A 2 pound ball-peen hammer is most useful for a beginner, with a cross-peen hammer being a good second choice. For reference, I’d say 4 pound hammers are “heavy”, 2 pound hammers are “medium”, and 1 pound hammers are “light”. 4 pounds doesn’t sound like much, but trust me: A 4 pound hammer will kick your ass when you’re first starting.
-
Get excited and learn a little! Here are some of my favorite online resources for learning about blacksmithing:
- YouTube - John Switzer / Black Bear Forge. I consider this to be the best blacksmithing resource on the internet. Practical, correct, and interesting content. Incredibly useful for learning regardless of skill level.
- I Forge Iron forums. Active community of blacksmiths. Great for when you have a question and nobody to ask.
- YouTube - Nils Ögren. Very inspiring content showing the forging process, but not in a tutorial style. Still very useful for learning.
- YouTube - Torbjörn Åhman. Very inspiring content showing the forging process, but not in a tutorial style. Still very useful for learning.
- Bladesmith’s Forum and Blade Forums. Decent forums that cater to professional or “serious” bladesmiths. Not a great resource for a beginner smith, but good to keep in your back pocket.
- YouTube - Alec Steele. Fun and inspiring blacksmithing content. Practically useless for learning regardless of skill level.
Health & Safety
We only get to remain healthy and uninjured for a brief period of our lives. Let’s do what we can to make that moment last as long as possible.
Blacksmithing is a dangerous activity, so you must use your brain. I will not be there with you and so cannot be responsible for your safety. Carelessness and not adhering to common sense are the two most common sources of injury, but I’ve tried to include points that a beginner cannot derive from common sense.
Learn from Others, but Keep Your Brain On
One of the best things you can do is work, in person, with someone who has been doing this for a long time. Reading is great, but there is so much intuition you will build by watching how someone works and what they remain cautious of. Memory also works much better in context - it will be easier for you to remember safety principles if you learn them in a similar context to where you apply them.
You will probably encounter inflated egos and folk wisdom at some point. Some injuries are acute (e.g., you grab a hot piece of metal and are burned immediately), but some only develop over the course of years or decades (e.g., lung, tendon, and hearing damage). This allows people to do stupid things for many years without realizing the consequences. Phrases such as “I’ve done this dozens of times and it’s fine” or “I’ve been doing this for X years and never had any issues”, paired with something your gut tells you is unsafe, are a sure sign something is wrong. It is better to deal with the social discomfort of rejecting bad advice than live with an injury.
I’ve encountered all sorts of shitty advice over the years, and you will too. Use your brain.
Glowing Things Are Very Hot…
Duh. Don’t touch them. When I’ve been burnt by red-hot metal, I sometimes smell it before I feel it. You will be burnt too quickly to realize and react.
You can use a pair of tongs to touch hot things:
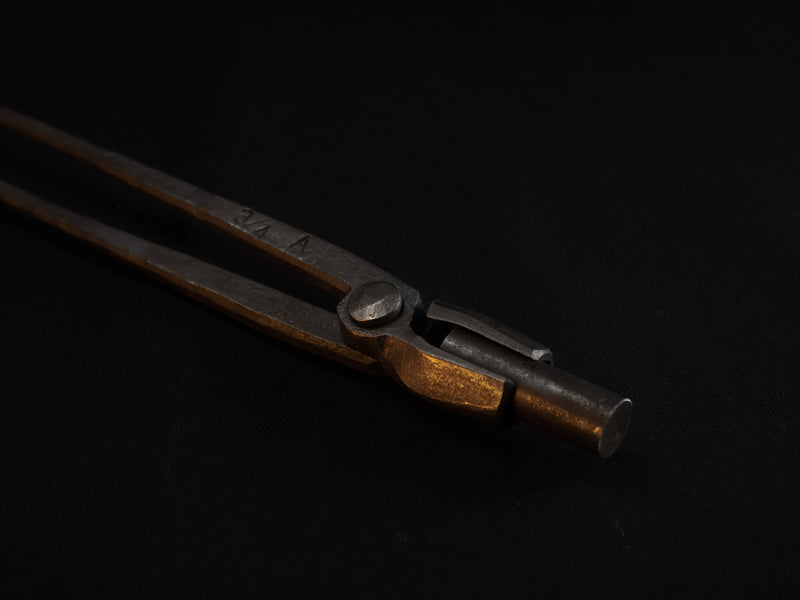
You cannot use a pair of gloves to touch red-hot metal and should not rely on clothing to stop you from being burned.
The rest of this safety section can be skipped, but if you want to know about why things glow:
All materials emit thermal radiation (in the form of light) at all times. Hotter bodies (not that type of hot body) not only emit more light, but emit light with a different spectrum. You can observe this in terms of brightness (how much light is emitted) and its color (the spectrum of light emitted). If you want, you can read more about the Planckian locus (what colors do things glow, exactly?) and Black-body radiation (how and why do things glow?)
The previous paragraph didn’t mention steel a single time, and so you can apply this to many things in everyday life. Incandescent light bulbs, hot coals of a campfire, your toaster oven or stovetop, the sun and distant stars, and steel all glow because of the same underlying physical principle. Here’s a picture of the Planckian locus: You can see that objects start glowing with a pure red, increasing to orange, yellow, white, and eventually blue.
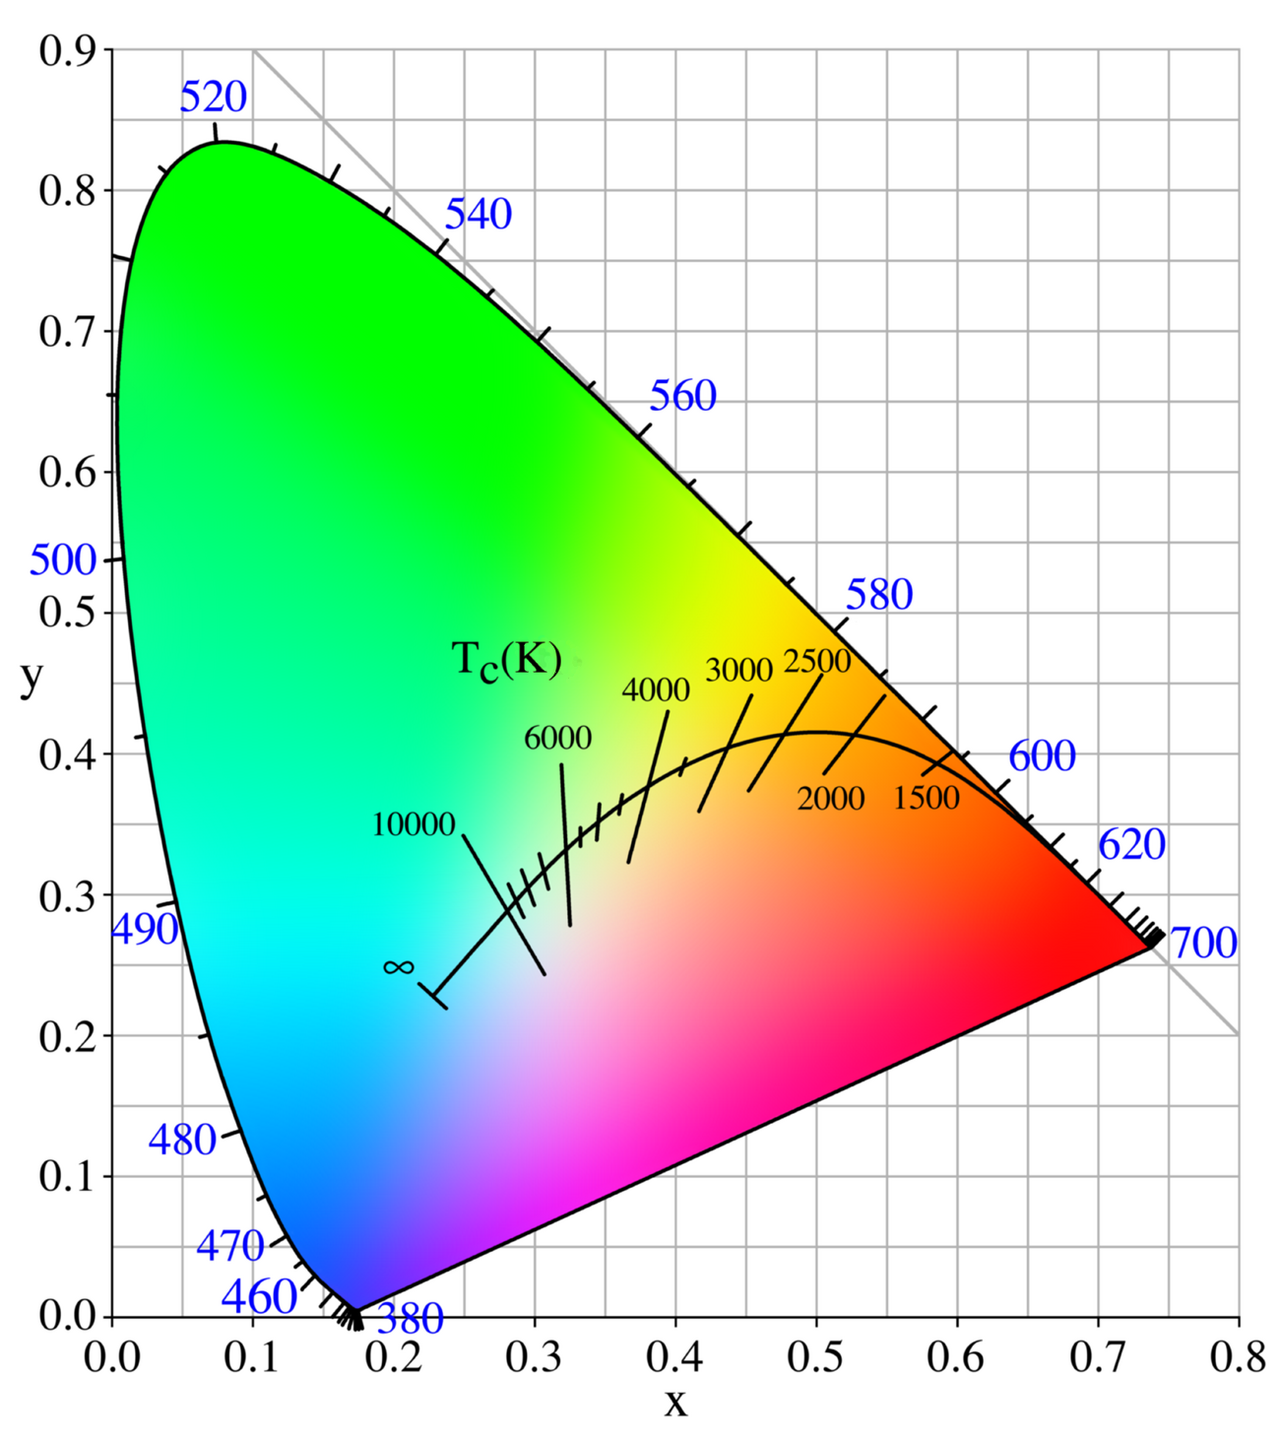
You can search for “steel Incandescent colors chart” online, but basically every chart you find will be useless to you. Communicating these colors in a digital format is an unbelievably complicated rabbit hole due. I’ve written and deleted a paragraph here about 5 times, but cannot find a way to condense the mess into something worth reading. Trust me that it’s complicated, and one of my ongoing projects is working on creating a useful temperature chart.
In the meantime, here are some rough guideposts you can use:
- 800F: A dull red glow is first visible in a dark room or at night after your eyes have adapted to the darkness.
- 1200F: A dull red glow is visible in direct sunlight.
- 1500F: Orange.
- 1900F: Bright yellow.
- 2200F: White and emitting sparks.
…But Not All Hot Things Glow
It is relatively easy to avoid grabbing onto the bright glowing things that scream “I’m dangerous”. It’s much harder to remember that things can be dangerously hot despite looking safe to touch.
There are two good ways to test how hot something is.
The first is to pour a little water on it. If the water sizzles off or evaporates quickly, don’t touch it. If the object stays wet, then it’s probably below 200F. You wouldn’t stick your hand into a boiling pot of water, so take “wet” to mean “it won’t immediately melt the flesh off my body, and instead, I might just get a slightly painful burn” rather than “it’s safe to touch”. Pouring water is not always an option. Rapidly cooling steel (with the exception of low-Carbon/“mild” steel) hardens it and makes it brittle.
The second method is to hover the backside of your hand / knuckles over the object without touching it. If it feels hot, it’s hot. The pads of your fingers have one of the highest densities of nerve endings in your body - don’t let them get burned. Instead, test with your knuckles.
You should also remember that tools that touch hot things get hot. Your tongs, chisels, punches, vises, etc. will get hot. I barely ever get burned anymore, but when I do, it’s from touching a tool that I’m not expecting to be hot.
Wear PPE
Some blacksmiths refuse to wear gloves. They have a few reasons for this:
- You have worse control over your tongs and hammer.
- Gloves can give you a false sense of security - You’ll still get burned if you try to hold a red hot piece of metal.
- Gloves can worsen burns. When you grab something that’s too hot, the glove heats up and will keep your body exposed to the damaging heat for longer. You waste time trying to get the hot glove off.
I wear gloves because:
- Hot things exist and I don’t like getting burned.
- Sharp things exist and I don’t like getting cut.
- Pointy things exist and I don’t like getting stabbed.
- Lighting a propane forge causes a small fireball and I like having finger hair.
- Oily and dirty things exist and I don’t like touching them.
- I don’t like getting blisters from swinging a hammer all day.
It’s up to you whether or not to wear gloves, but I highly recommend it.
You absolutely must wear eye protection and hearing protection. Eye injuries often cannot be healed but can be easily prevented with a shitty $1 pair of safety glasses. Hearing damage is accumulative and permanent. A single forging session won’t wreck your hearing, but years of forging will irreparably harm your hearing if you don’t wear hearing protection. A shitty $0.50 pair of foam earplugs will prevent this.
If you forge in a coal forge, you should wear a face mask. Most smiths do not do this because it’s sweaty and annoying. A lifetime of suffering caused by black lung disease is also somewhat annoying, so you be the judge of whether a pack of disposable dust masks is worth your money.
If you grind steel, you should wear a dust mask.
Propane - How to not Blow Yourself Up
Here is a photo of a forge I found online. The person who owns this forge wants to get silicosis - read more on that in the “Things that Do Not Belong in Your Lungs” section below. But it will do fine for explaining propane:
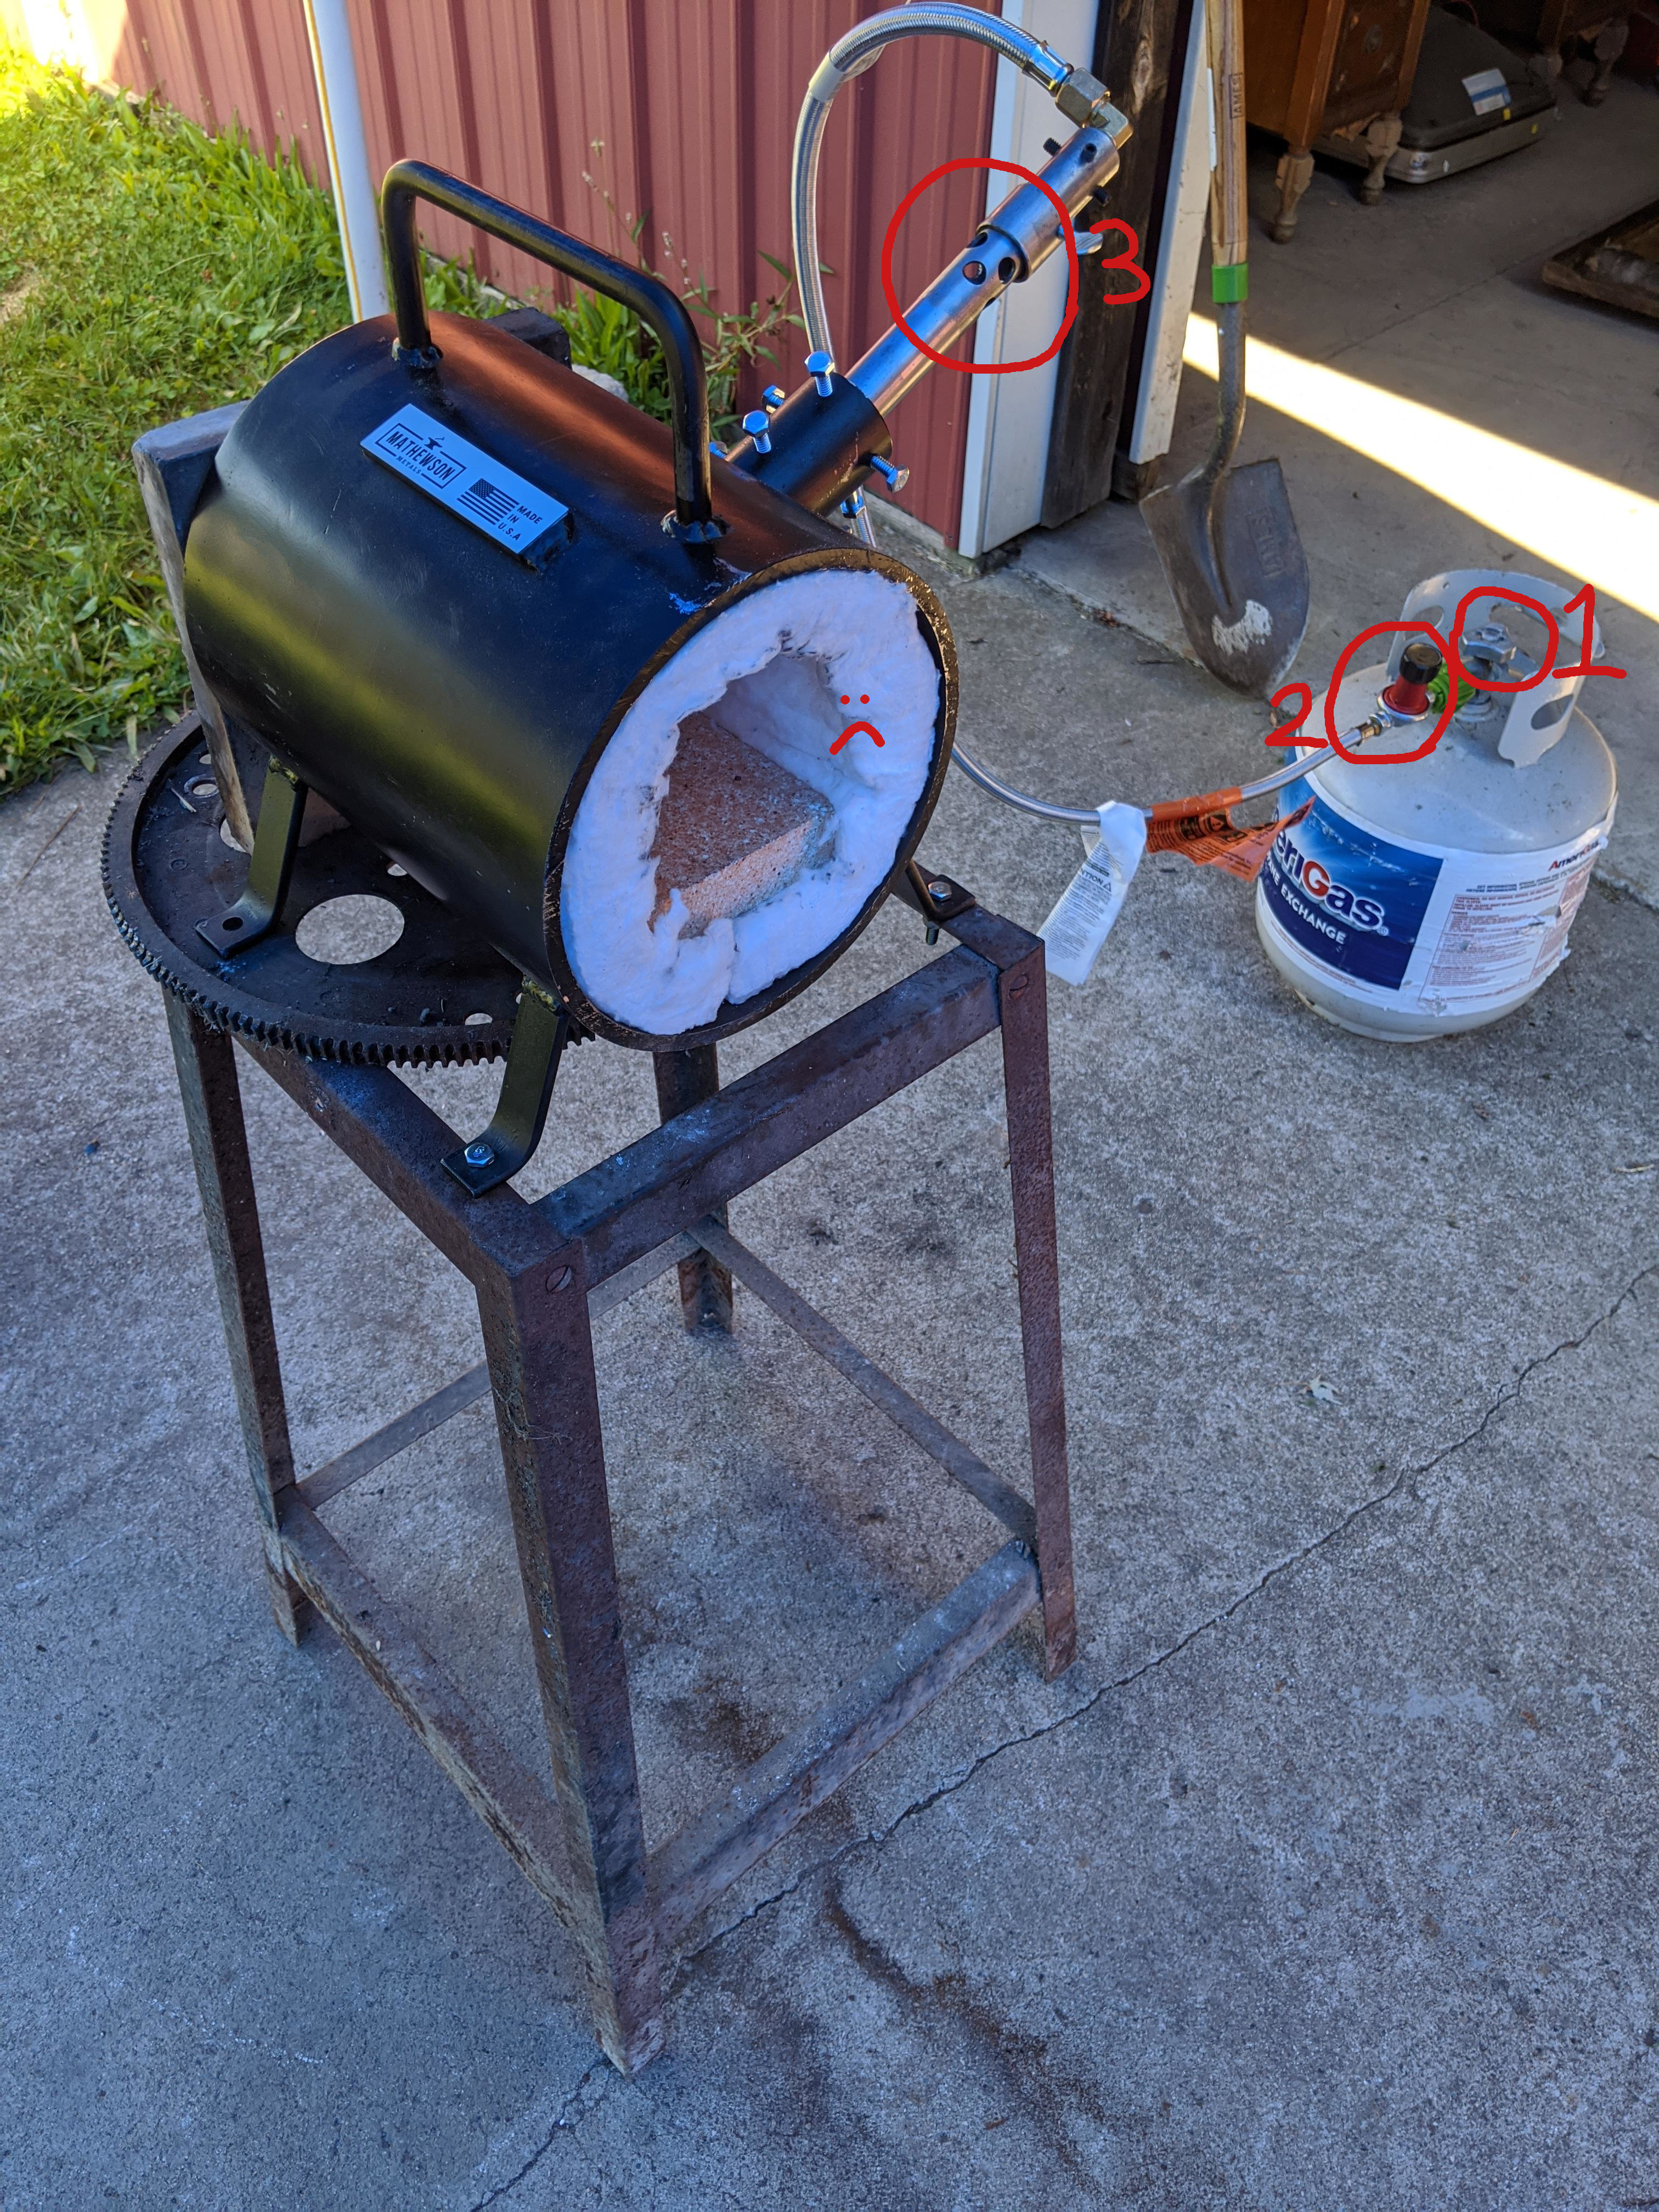
Most propane forges use what is called a “Venturi burner” (the long straight thing sticking out of the forge - these operate through the Venturi effect). This is a type of burner where fuel is supplied actively (in this case, from a propane tank), and oxygen is provided passively, drawn in through the holes circled in 3. These holes are paired with an adjustable cover, which allows the user to control the air/fuel mix going into the forge. The rest of the anatomy is:
- This is the main valve of the propane tank (duh). It should be fully closed when the forge is not in use, but should be fully open when lighting and using the forge. It is not what you will use to regulate the pressure/flow of propane into the forge.
- Every propane forge should have a high pressure regulator connected to the propane tank. Propane forges require pressures between 5-25 PSI, which is much higher than you’d see on most pressure regulators (e.g., one hooked up to a propane grill). This pressure regulator is what you’ll use for precise adjustments to the flow of propane. Note that the threads on a pressure regulator are often “left-handed”, meaning they are opposite the usual “righty-tighty, lefty-loosey” convention.
- This is the Venturi burner (specifically, the Oxygen holes) mentioned above.
In order to safely use a propane forge, you should first verify that all fittings are not leaking. This should be performed every time you switch out the propane tank, or any other component that you’re trusting to stop you from blowing up. Thankfully, this is cheap and easy to verify. The steps are:
- Get some soapy water. Spray or dribble it over all fittings/connections.
- Verify that the pressure regulator (2) is fully closed. Remember that it might use the opposite tightening convention than what you’re used to.
- Slowly open the valve on the propane tank (1). If you hear a hissing sound, then propane is freely flowing and the pressure regulator (2) is probably not actually closed. Close (1), let the area air out for a minute, and try again with the pressure regulator (2) screwed the other way. If you do not hear a hissing sound, verify that no fittings are leaking by looking for any bubbles forming in your soapy water. If you do not see any bubbles, you don’t have any serious leaks.
In order to light a propane forge, go through these steps:
- Confirm that (1), (2), and (3) are fully closed.
- Make sure you have a welding striker or some other method of igniting propane.
- Fully open (1). This should not allow any propane to enter the forge. If you hear propane flowing, then (2) is not fully closed or you have a leak. Close everything, let the area air out for a few minutes, and start over.
- Gradually open (2) until you hear propane flowing. Spark your welding striker near the mouth of the forge. If it does not ignite, either strike further into the forge or open (2) more. When the propane ignites, it will make a brief, small, cloud of fire (a few cubic feet). Don’t stick your face right in front of the forge when lighting it. Some flames will continue to billow out of the forge until you increase the Oxygen flow in the next step.
- Gradually open (3) until you have a balanced air/fuel mix. The ideal air/fuel mix is indicated by the flame being a pale blue (or even greenish blue). If the flame is a dark blue, then Oxygen is in excess and should be reduced.
After lighting the forge, you can freely adjust (2) and (3) to get your desired flow rate and air/fuel mix. Opening (2) more makes the forge hotter. Adjusting (3) controls the air/fuel mix and ensures the forge interior is neutral (not super important for a beginner to worry about, but critically important when forge-welding and heat-treating).
Swinging a Hammer - Preserve Your Tendons
Blacksmithing is quite hard on the tendons in your hand, which can lead to Trigger Finger. I first learned about this a few years ago when I developed it. Changing my hammering technique and wearing a splint led to a full recovery, but you really don’t want anything to recover from in the first place.
Here’s a statement many beginners (myself included) would think is true: “When forging, a hammer’s energy mostly comes from the blacksmith swinging downwards. A blacksmith can control this by swinging harder or softer.”
This type of thinking leads to injury. The truth is actually this: When forging, a hammer’s energy mostly comes from the blacksmith adding potential energy by lifting it to a height. That potential energy is converted to kinetic energy by gravity, with little energy added from the blacksmith swinging the hammer downwards. A blacksmith can control this by using a heavier or lighter hammer.
In practical terms, what this means is that your only job is lifting the hammer and guiding it as it falls. You should not try to beat up the metal by swinging the hammer harder, no matter how cool that may look or feel. Your grip should be very light - at the peak of your swing, a bystander should be able to plug the hammer right out of your hands. The exception to this is when you’re doing light/delicate work. In those situations, you’ll simply have to swing a light hammer, and this is mostly fine. But for extended, heavy, forging work, you should let gravity do the work.
I’ve written this as dogma, but please trust me on this: You should keep a light grip. You are a hammer lifter, not a hammer swinger.
Things that Do Not Belong in Your Lungs
-
Coal dust (preventable with a dust mask)
-
Metal dust (preventable with a dust mask)
-
Hexavalent Chromium (preventable with good insulation). Chromium is a common steel alloying element, found in all stainless steels and many non-stainless alloys. When heated to forging temperatures, Chromium reacts with the Oxygen in the air to form various types of Hexavalent Chromium. These compounds are carcinogenic and do not belong in your lungs. In Chromium containing steels, only a thin layer of Chromium near the surface can react and form this compound (although more may be exposed during the forging process as material is lost as forge scale). The dangers here can be prevented with good ventilation, but I’m not confident here and only rarely forge high-Chromium steels.
-
Zinc Oxide (preventable by never working with any form of Zinc, e.g., galvanized steel). Unlike the other things on this list, which may reduce your quality of life or increase your cancer risk, Zinc Oxide will kill you. Never, under any circumstance, put Galvanized steel, or any other form of Zinc, into a forge. It is possible to survive Zinc poisoning, but even with short exposure, you can poison yourself and die. Be cautious of putting random pieces of metal/scrap into a forge. Some people take pieces of galvanized steel and strip off the Zinc through chemical or abrasive means, then forge what’s left over. In principle, this can work, but would you bet your life on it? See Metal fume fever for more info. I’ll say it one more time in case you’re skimming: Zinc will kill you.
-
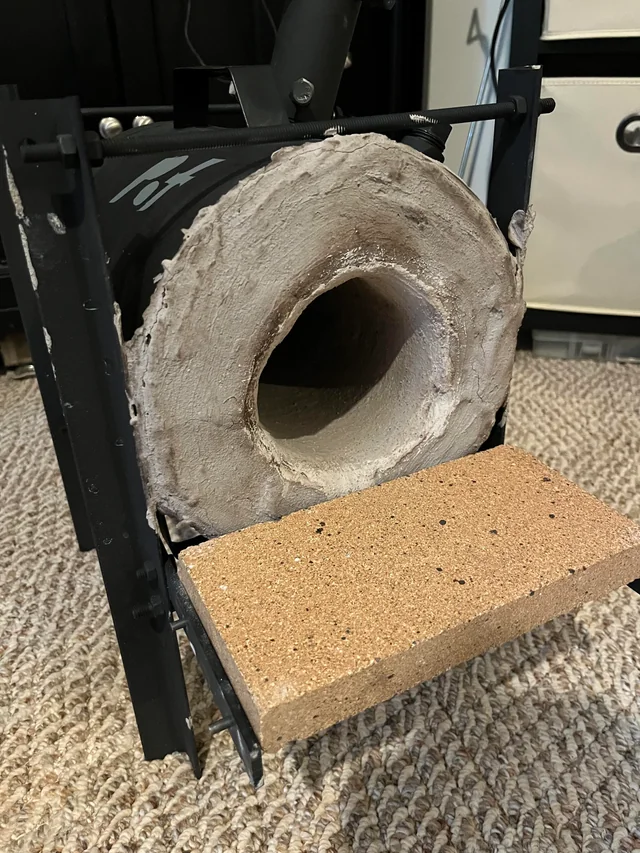
Ceramic wool insulation (preventable with rigidizer + refractory cement). Propane forges are insulated with a thick ceramic wool blanket. This increases the efficiency of the forge and increases the maximum attainable temperature. In the following photo, the thick white lining is the ceramic wool:
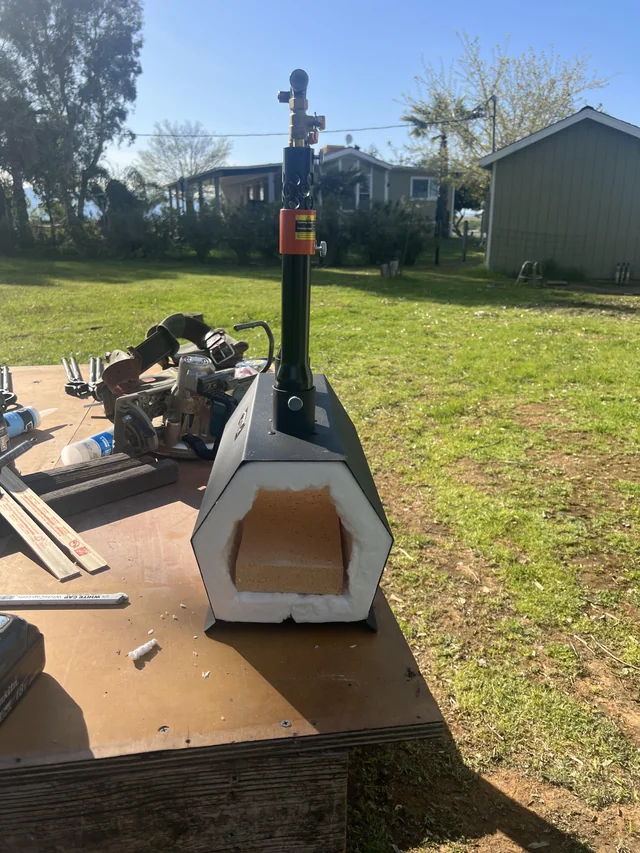
If the pictured forge were used in its current state, the microscopic fibers that make up the ceramic wool would slowly be blown out of the forge. These are particularly dangerous and will cause Silicosis within a year or two. Here is an image you will encounter floating around the internet:
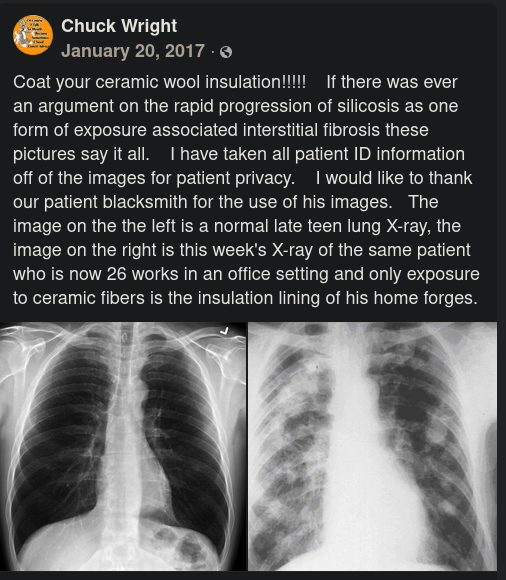
If you do not want your lungs to block X-rays, you need to make sure any propane forge you work in has its ceramic wool insulation properly coated with, at minimum, some type of rigidizer (which often looks like cement). A blacksmith worth their salt will have coated their forge not only in rigidizer, but also with a specialized refractory cement (e.g., the product named “Satanite”) and an infrared-reflective coating (such as Plistix 900F or ITC-100). If the forge interior looks fibrous, it has not been properly coated and you should not use it. If the forge interior looks like cement, you’re fine. Make sure to check that no patches of refractory have flaked off (revealing the ceramic wool underneath).
Here’s an image I found online of a forge that’s been beautifully coated. It may not look very pretty, but I can tell from a glance that it is fantastically well insulated and will not give you silicosis.
Remember to Eat and Drink…
Blacksmithing is about as calorie-draining as moderate hiking, according to my smartwatch. Give your body what it needs.
…But Don’t Eat or Drink Forging Scale
This one is included as a half-joke. You know how I keep rambling about common sense and using your brain? A local blacksmith I follow(ed) on social media posted a video in which he taught a blacksmithing class. In addition to forging, the students got to make their own Hot Toddy, a kind of heated alcoholic beverage. To heat the liquid, this blacksmith had the students quench a red hot piece of steel in their cups. You will find that steel accumulates forging scale at forging temperatures. This is a flaky layer of Iron oxides and a decent amount of it flakes off during quenching. In other words, those hot toddies almost certainly had forging scale in them, and were no longer safe to drink. Steel alloys often result in exciting (read: dangerous) chemistry, like the carcinogenic Hexavalent Chromium mentioned above. This was a stupid, unnecessary, and dangerous thing to do, but the video shows the students happily drinking their hot toddies.
The blacksmith in question was once a chemistry professor and now works as a professional smith. The credentials and experience of someone teaching you should never override your common-sense intuitions about safety. Don’t rely on someone else’s brain when it’s your body at risk. Use your brain.